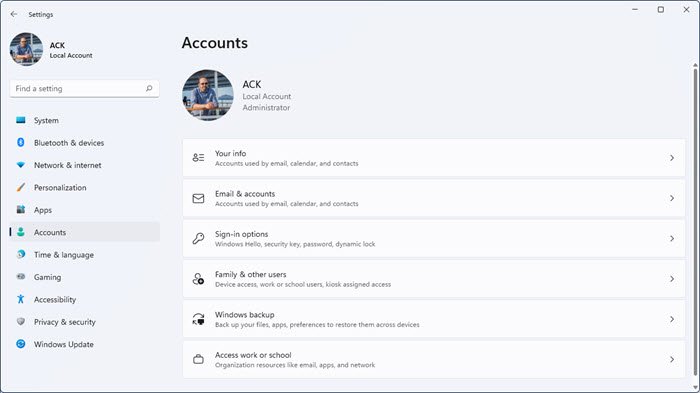
User Accounts Settings in Windows 11
To access the Accounts settings in Windows 11, right-click on the Start Menu and select Settings. Now, in the Settings app, select the Accounts category from the left pane. This will open the Accounts page in Windows 11 Settings app, where you can see your account info, add or delete users to and from your system, change sign-in options, etc. On the Accounts page, the following sub-categories are available: Clicking on each of these sub-categories will open further options to customize your account settings. We will describe each of these sub-categories in detail. Let’s start.
1] Your info
As the name implies, you can view and manage your account info here. You can add, remove, or change your profile pic. For this, click on the Browse files button next to the Choose a file tab and select an image from your computer hard drive.
You can also upload your image by capturing it via your laptop’s camera or webcam. But make sure that you have granted access to your webcam or laptop’s camera. To check this, open the Privacy & Security settings and click on the Camera tab under the App permissions section. Now, turn on the button next to the Camera app. Windows 11 also has some default PNG image files stored in the C directory. You can also replace your profile pic with these default PNG image files. If you don’t want Windows to sign in to all Microsoft apps automatically, you can disable this feature by clicking on the respective link under the Account settings section on the same page. The Related settings section lets you manage your user account online. When you click on that tab, Windows will open your Microsoft account in your web browser, where you have to sign in by using your account details.
2] Email & Accounts
This section shows all your Microsoft accounts that you have added to your device. Here, you can also add a new account that is used by email, calendar, and contacts. That account can be a Microsoft or a non-Microsoft account, like Office 365, Google, Yahoo, iCloud, etc. If you want to remove these accounts, simply click on the account to expand it, and then click on the Manage button. This will open a pop-up window in which you have to click on the Delete account from this device option.
In the Accounts used by other apps section, you can add a Microsoft account and a work or school account. Like the Your info settings page, the Email & Accounts page also lets you manage your Microsoft account online. For this, click on your Microsoft account to expand it, and then click on the Manage button.
3] Sign-in Options
As the name implies, here you can set up different sign-in opinions for your Windows 11 PC. Windows 11 offers the following six different types of sign-in options:
Facial recognition (Windows Hello)Fingerprint recognition (Windows Hello)PIN (Windows Hello)Security keyPasswordPicture password
To set up Facial recognition and Fingerprint recognition, your device should have a compatible camera and fingerprint scanner. Windows Hello PIN is a four-digit numeric code that you can use as one of the sign-in options. You can also create a Security Key to sign in to Windows 11 apps. A Security Key is a physical device that you can use to sign in instead of your username and password. To set up a Security Key on Windows 11, simply click on it and then click on the Manage button. After that, Windows will ask you to insert a USB device. Insert your pen drive and follow the on-screen instructions. Similarly, you can create a password for signing into your computer. After creating a password, you have to use it on the login screen. If you want to change your password, click on the Password tab to expand it and then click on the Change button. Password is the most secure way to log into a Windows 11 computer because a password lets you use different combinations of letters, numbers, and special characters. Windows 11 also offers one more way to sign in, Picture password. In a Picture password, you can use any picture and create gestures on it.
If you scroll down the Sign-in options page in Windows 11 Accounts Settings, you will see the Additional Settings section. Here, you can set up a Dynamic Lock on your system. The Dynamic Lock is a useful feature in Windows 11 that works when you connect your smartphone with your computer via Bluetooth. When you turn off your Bluetooth or your computer goes out of the Bluetooth range of your smartphone, it will lock itself. In addition to this, you can also select whether or not you want to see the login screen every time you wake up your computer from sleep.
4] Family & other users
If you have a shared computer, this sub-category in Windows 11 Account Settings lets you create a separate user profile. You can create a separate profile for your family members and other users. To use this feature, you have to sign in with your administrator account. You can create different types of user accounts in Windows 11 and each of these accounts is different from one another in some features. Windows 11 stores the data of each user’s account in a separate folder in the C directory. No user can access the other user’s folder in the C directory except the Administrator. To add a family member, click on the Add account button under the Your family section. After that, you can create a new account for your family member. If your family member already has an Outlook account, you need not create a new one for him/her. Simply enter his Outlook email address and click Next. After that, he/she will receive an invitation link on his/her email ID. When he/she accepts the invitation, his/her account will be added to your computer automatically under the Your Family section.
You can manage your family member’s account settings by clicking on the Manage family settings online or remove an account button. After that, Windows will open your Microsoft account on the web browser, where you have to sign in using your account details. After signing into your account online, you can add or remove restrictions to your family member’s account, like screen time limit, content filters, etc. To remove a member from your Family group, click on the three vertical dots next to the name of your family member and select Remove from family group. After removing a person from your family group online, his/her profile will be removed from your computer automatically.
In the Other users section, you can add those persons who are not your family members. Simply click on the Add account button and enter the email address of that person. Or you can create a new account by clicking on the I don’t have this person sign-in information link.
5] Windows backup
Here, you can back up your files and folders by syncing your OneDrive account. Windows 11 also remembers your passwords, language preferences, and other settings. By default, this setting is enabled, but if you want, you can turn it off in the Windows backup category of your account settings.
6] Access work or school
Here, you can connect your work or school account to your Windows 11 computer. Simply click on the Connect button and then enter your work or school account information. If you are a Windows 11 Pro user, you can create a new school or work account.
The Related Settings section of the Access work or school account setting is for IT administrators. Here, the IT administrators can export the management log files, add or remove the provisioning package, etc. By adding the provisioning packages, IT administrators can easily configure the users’ devices without imaging. By doing this, they can quickly apply the configuration settings to the target devices. This setting is helpful for small-scale to medium-scale businesses.
How do I change user accounts in Windows 11?
You can change the user accounts type in Windows 11 by following the steps below:
How do I find User settings in Windows?
To open the user account settings in Windows 11, launch the Settings app and then select the Accounts category from the left pane. This will open the Accounts page in WIndows 11 settings where you can manage your info, account settings, add or remove family and other users, etc. Hope this helps.